Category Archives: Baking

The Great Toaster Oven Experiment: Focaccia

Continuing with alternative baking methods/bread, I decided to attempt focaccia. Spoiler alert: not perfect, but perfectly acceptable in a pinch.

In my search for a suitably-sized vehicle, I discovered that out of the dozen or so bread/loaf pans accumulated in decades of marriage — this not being the first for either of us, though that may not explain the excessive number — only one actually fits in the toaster oven.

Dimensions, for anyone else who is oven-less, or wants to give this a try (the rest of you can enjoy a short snooze):

  • Length: Exterior including handles 9.75″/25 cm; interior 8.25″/21 cm
  • Width: Exterior 5″/12.25 cm; interior 4.25″/11cm
  • Height: 2.5″/6.5 cm

Ingredients

(Dough)

  • 1 cup warm water (not too hot; you don’t want to cook the yeast)
  • 1 teaspoon dry yeast
  • 2- 2 1/4 cups all purpose flour
  • 1 teaspoon salt
  • 1 tablespoon (more or less) extra virgin olive oil (EVOO)

(Topping)

  • 12 pitted olives, Kalamata or Castelvetrano, as you prefer, sliced
  • 1-2 tablespoons EVOO
  • 1-2 teaspoons chopped fresh rosemary (or 1 teaspoon dried)
  • Kosher salt or fleur de sel

Method

  1. Place warm water in a bowl. Sprinkle the dry yeast, stir and let it dissolve for about 10 minutes.
  2. Add 2 cups of flour and 1 tsp salt to the bowl and stir. The dough will be sticky.
  3. Turn out onto a floured surface and knead until smooth and elastic, about 8-10 minutes. Add more flour as needed. Shape dough into a ball.
  4. Pour a little olive oil into your bowl, add the dough, and roll it around until it’s lightly coated.
  5. Cover with plastic wrap and let it rise in a warm area until doubled, approx. 1 1/2 hours. (First rise)
  6. Punch it down, knead into a ball, return to the bowl, cover with plastic and let it rise in a warm place until doubled. This takes about 45 minutes. (Second rise)
  7. Pour a small amount of olive oil into your loaf pan and spread it around to coat the inside.
  8. Once the second rise is finished, punch it down lightly, transfer it to the loaf pan and let it rest for 10 minutes.
  9. Drizzle about 1 tablespoon of olive oil over the top of the dough. Sprinkle with chopped rosemary and add the olives on top. Let it rise uncovered for about 25 minutes. (Third rise).
  10. Using your fingertips, press indentations into the surface of the dough. The oil will pool in the indentations. Sprinkle lightly with coarse salt
  11. Bake at 450 degrees F (230C I think?) for about 15-20 minutes. Mine began to burn at 20 so keep an eye on it!
  12. Serve warm with more olive oil. Adding garlic and herbs (oregano, rosemary, thyme) to the oil is even better.

How to MacGyver Oven-less Baking

Wanting to take advantage of an overabundance of fresh tomatoes, I had a pizza craving yesterday. I could have ordered one, but a) take-out pizza around here is less than stellar, b) I only wanted a small portion for lunch, and c) I was mostly in the mood to bake and we don’t have our ovens yet. (Ah, the endless joys of home remodeling.)

One option would have been the grill but I didn’t feel like a massive post-lunch cleanup and preferred something quick and easy. Solution: the toaster oven. I was also curious to see if other items like cookies or baklava could be baked in it.

Step 1: Divide a pizza dough recipe by 25% to make a quantity that might fit in the toaster oven. Caveat, this is not my favorite recipe, which is best made 2-3 days ahead, but it was ok in a pinch:

  • 1 cup bread flour (sorry, MacGyvering did not allow time to convert to grams)
  • Scant 1/4 teaspoon sugar
  • Heaping 1/4 teaspoon active dry yeast
  • 1/2 teaspoon coarse salt
  • 1/2 teaspoon olive oil
  • Approximately 1/4 cup warm water

Method

  • Mix dry ingredients in a medium-large bowl
  • Add most of the olive oil, retaining a small amount in reserve
  • Add about half the water, and begin mixing everything together
  • If dough is too dry/crumbly, add more water a little at a time until it comes together. Likewise, add more flour if the dough is too soggy.
  • Dump dough onto a lightly floured surface and knead until it forms a ball.
  • Spread remaining oil around the inside of the bowl, add the dough, and roll the dough around until it’s lightly coated. Cover with plastic wrap and set aside in a warm place to rise for 1 hour.
  • After the dough has nearly doubled in size, punch it down lightly and shape it into a rectangle on an aluminum foil “tray” that will fit in your toaster oven.
  • Pre-bake the crust at the hottest temperature (mine only heats to 450F) until golden brown.
  • Remove from toaster oven and add toppings. I used a light layer of (more) olive oil, then sliced tomatoes, chopped fresh basil, and scattered bits of Boursin cheese because that’s what I had in the fridge.
  • Return to the toaster oven and continue baking until cheese is melted and everything is cooked. You can blast it on the “toast” setting towards the end to help brown the crust.

I can’t tell you exactly how long this takes because you’d have to experiment, but it was maybe 20-30 minutes baking time.

Before
After

Delicious quick lunch with my nonalcoholic Faux Cosmo:

Fill a tall glass with seltzer or sparkling water. Add a splash each of orange juice and cranberry juice. Add the juice of 1/2 lime. Garnish with a slice of lime. Pretty and refreshing!

When Bad Bread Happens to Good Restaurants

I hope this is not a new trend. In recent weeks, Dear Husband and I have eaten at two excellent restaurants with truly inferior bread. What gives??

First up, Toulouse — a lovely French/Creole place in Seattle, where one would expect to find good sourdough or certainly an acceptable baguette. Instead, we got flabby structure and squishy crust; mon Dieu!

Then, last week, a local place on the Oregon coast — the Bay House — which has a relaxing ambiance, superb service, and beautiful food (see below) — with this notable exception. Hey, if it’s too humid, pop the loaf in an oven to crisp it up! I’m tempted to bring my own sourdough next time. Think they’d mind?

At the Bay House, DH’s beet salad starter was a work of art
As was my halibut— those green shapes are pea purée

Bread lovers of the world, unite! And what’s your pet peeve when eating out, dear readers?

Going Nuts for Mokonuts’ Cookies

My friend T turned me on to this Paris bakery via a New York Times recipe, which Dorie Greenspan adapted from their unusual rye-cranberry-chocolate chunk cookie.

I made these yesterday and agree with the raves. T wrote about them this morning in her entertaining blog and I couldn’t wait to share the recipe with you. My only caveat is that the directions say that the dough makes 15 cookies, which seemed enormous. So I made 18 (roughly 2.5″ diameter) instead, and next time might go even smaller, perhaps 20 cookies, as they are quite hearty and filling. Enjoy, and let me know if you try them!

IMG-0274

Sourdough Made Simple

Sourdough has a reputation for being a bit tricky, so a lot of people find it intimidating. Thanks to my friend P, a fellow baking geek, I’ve been introduced to the Lahey method, which makes it super-easy to bake bread at home. I love this book!

IMG-0127.jpg

I’ve been experimenting with Lahey’s method for several weeks and my adapted recipe for sourdough is even simpler. It looks like a lot of steps but bear with me.

The genius part: Instead of folding/kneading your dough every few hours, you let your dough ferment overnight (18 hrs), do a second rise for 2 hrs and bake. No more being stuck in your house all day during the rising process!

STEP 1

All sourdough begins with a starter — natural yeast with a brinier flavor than the commercial yeast you find at the supermarket. Plan on 3-4 days before it’s ready to use. All you need is flour, water, air and time.

Mix equal parts water and flour in a wide mouthed container, cover it loosely so air can get to it, leave it out on your counter and wait. THAT’S IT. Really!

Once your starter is bubbly and active, try to make your dough within a few hours, before it loses potency. Thereafter, if you’re not baking regularly, dump out about 50-75% once a week, stir in equal parts water and flour, and start the process over.

IMG-0038.JPG

Starter is ready to use!

I encourage everyone to invest a few bucks in a kitchen scale and measure by weight rather than volume because 1) it’s easier and 2) it will guarantee consistent results. Remember, different flours have different densities so one cup of A may be slightly more or less than one cup of B.

Put your empty container on the scale, and set it to zero. Add 50g-75g whole wheat flour, 50g-75g bread (strong) flour, and 100g-150g cool water, resetting to zero after each addition. Don’t worry if you’re off by a gram or two as long as your ratio of total flour to water is roughly 1:1.

STEP 2

You’ve been patient and you now have over 100g of starter. Let’s get going.

Put a large bowl on the scale, zero it out, and add:

  • 600g flour (I like 475g bread flour +125g whole wheat or another grain)
  • 16g salt
  • ¼ teaspoon of active dry yeast (the kind you get at the grocery store)
  • 450g water
  • 107g active starter*
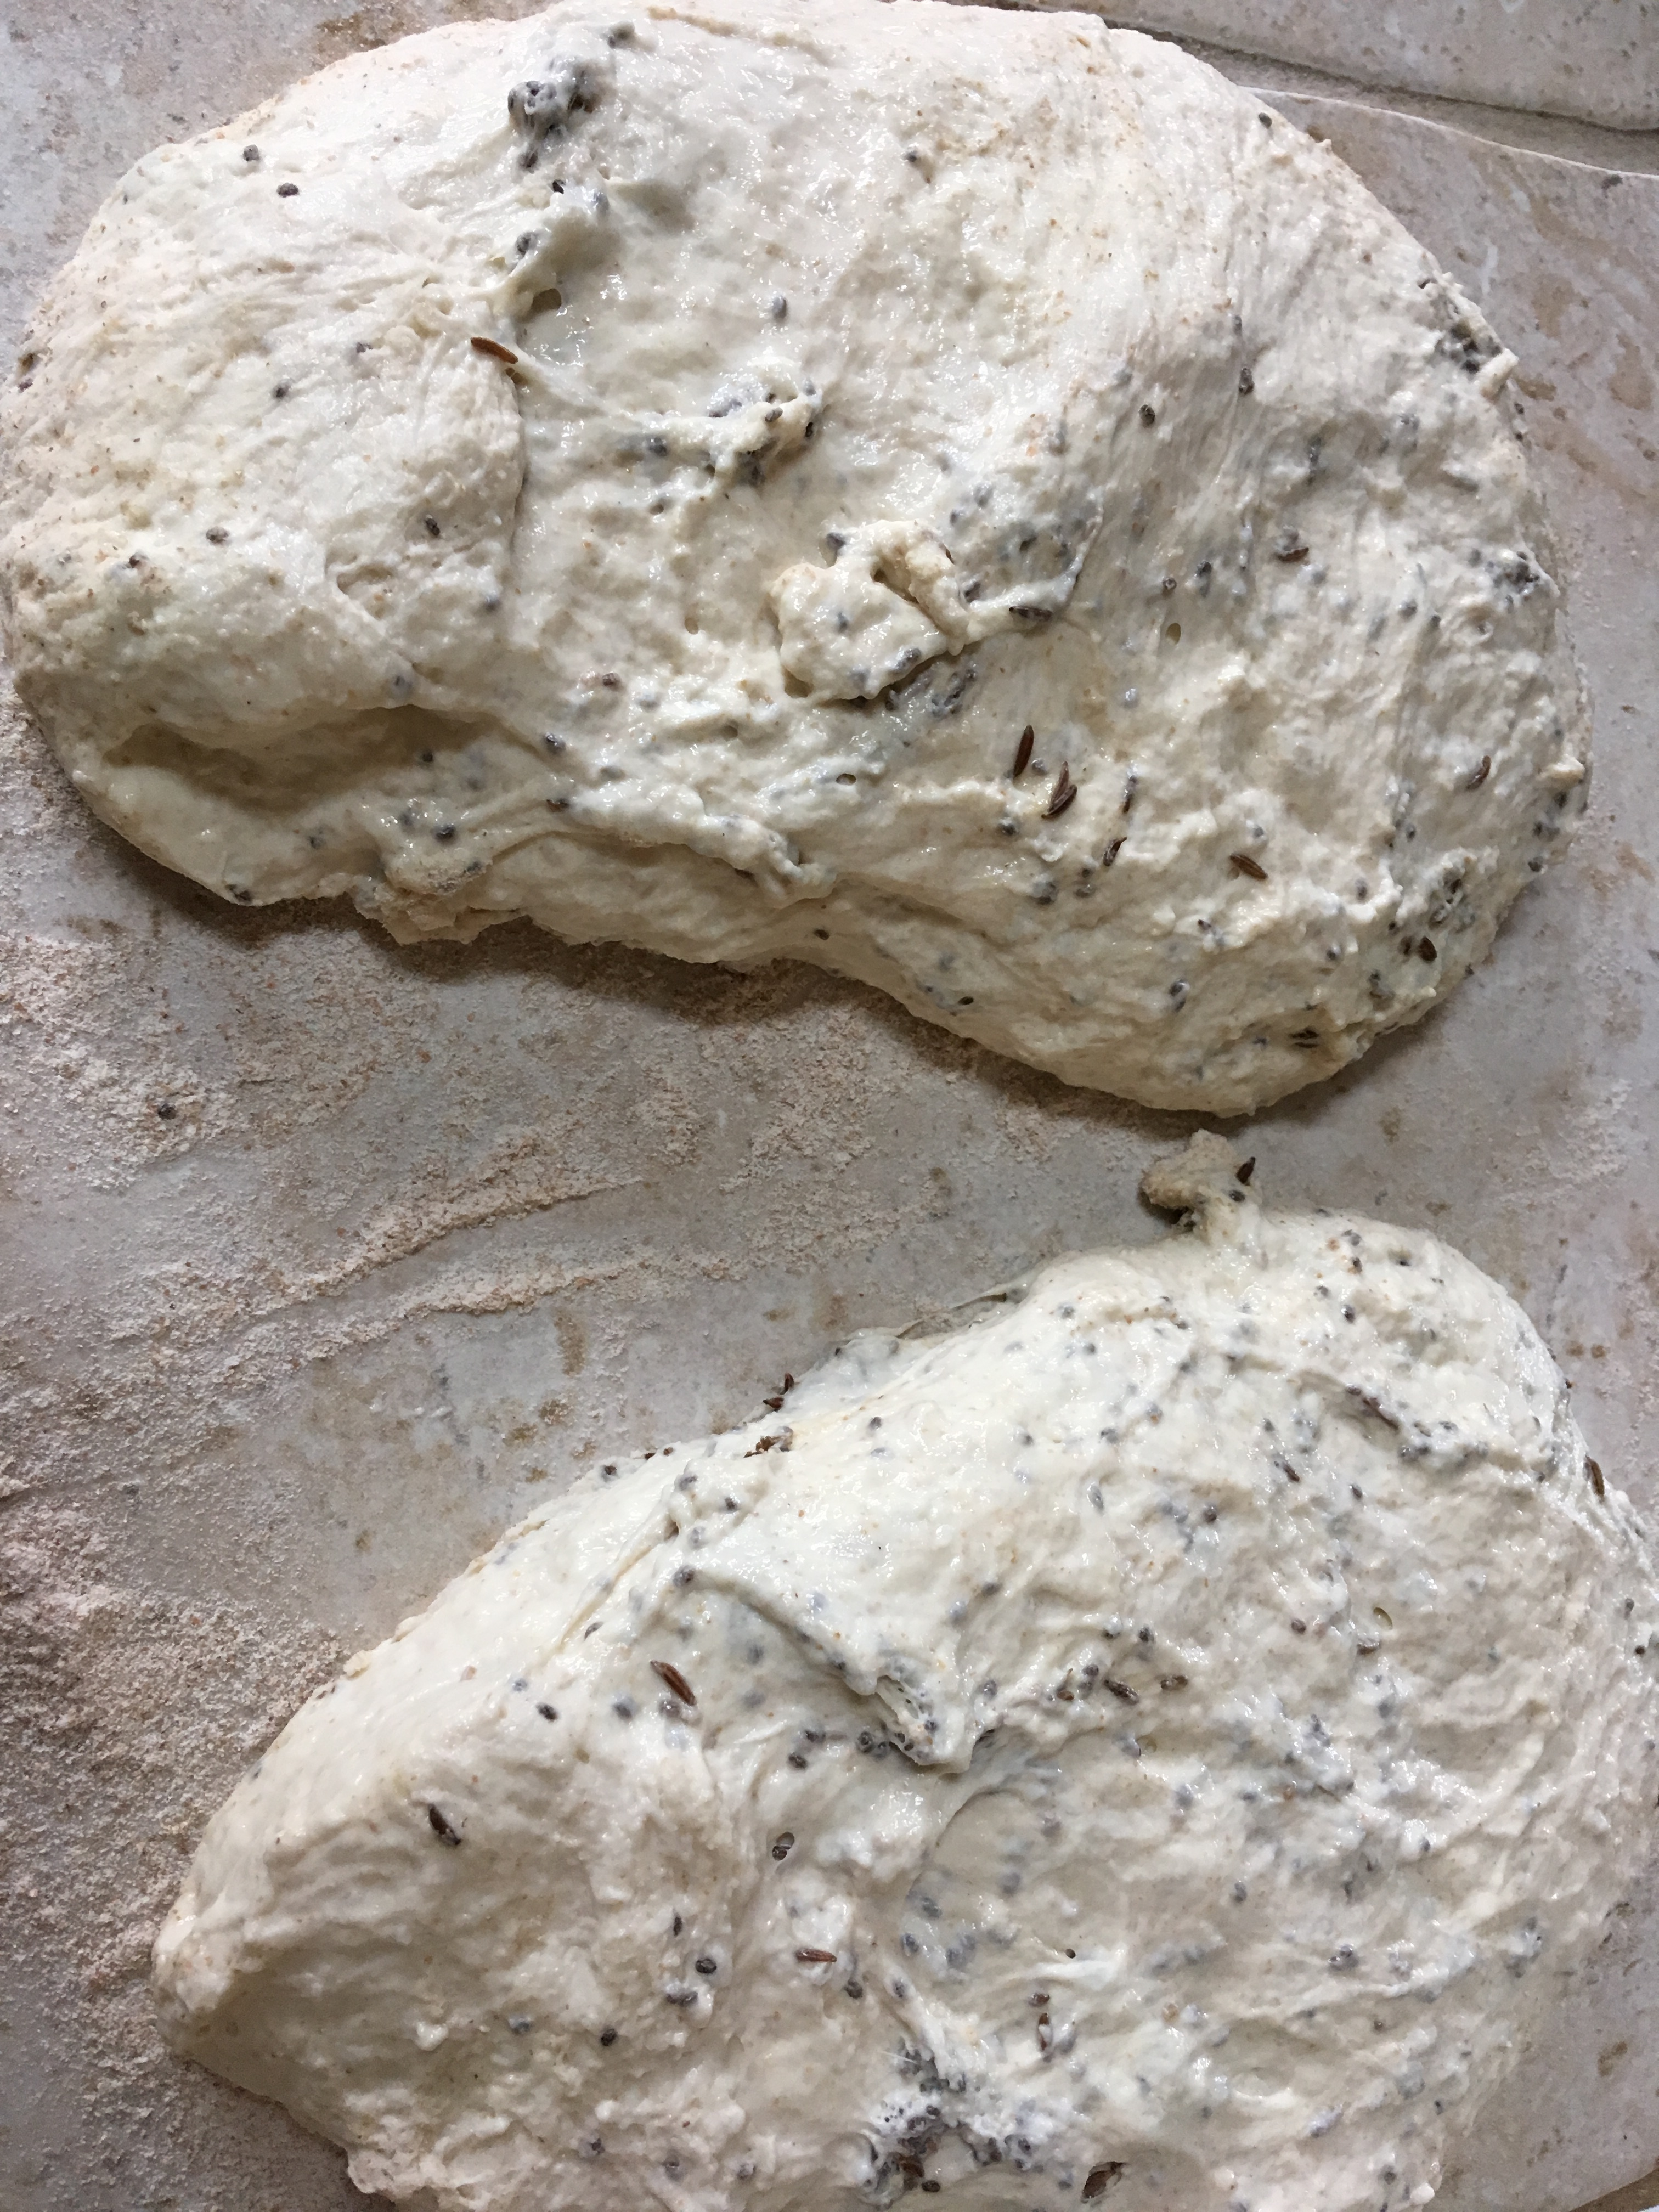
  • Optional: Add a generous handful of chia seeds and a tablespoon of caraway seeds, as I’ve done here.

*If this amount uses up most of your starter, replenish by adding  50g flour plus 50g water, mix well and set it aside to reactivate for a couple of days.

STEP 3

IMG-0110

Once you have a well mixed dough (it will be sticky; DO NOT be tempted to add more flour), loosely cover the bowl with plastic wrap and leave it out at room temperature overnight for 18 hours. If you do this at, say, 4 PM, your dough will be ready for the next step at 10 AM the next day.

STEP 4

18 hours later, your dough will be bubbly and will come away from the bowl in long strands – this is the developed gluten. It will be loose and sticky; don’t add more flour!

IMG-0121

IMG-0114

Those strands are the gluten

Dump it onto a lightly floured counter, and form the dough into a ball by tucking the edges under – using either a dough scraper or your (lightly floured) hands.

IMG-0116

The dark bits are the chia and caraway seeds.

STEP 5

The traditional method is to bake your dough in a pre-heated cast iron pot.  This is an easy alternative.

Divide dough into two balls. Shape each ball into a log and put them in a perforated baguette pan. For a free form shape, place your logs (or ovals) onto a baking sheet that’s been generously dusted with cornmeal. Leave plenty of room between them.

IMG-0115.JPG

IMG-0118

Lightly dust the tops with flour. Cover the pan or baking sheet with a linen or cotton dishtowel (avoid terry cloth) or plastic wrap, and let the dough rise again for 2 hours.  After 1.5 hours have elapsed, preheat your oven to 500 degrees F.

STEP 6

After another half hour (the full two hours), your dough will have puffed up nicely. Spritz your hot oven with water, put the bread into the oven and lower the heat to 475 degrees F.

You can spritz again after 2-3 minutes to keep the steam going and create a crispier crust. You can also score the dough at this point to let steam escape during baking but it’s not crucial.

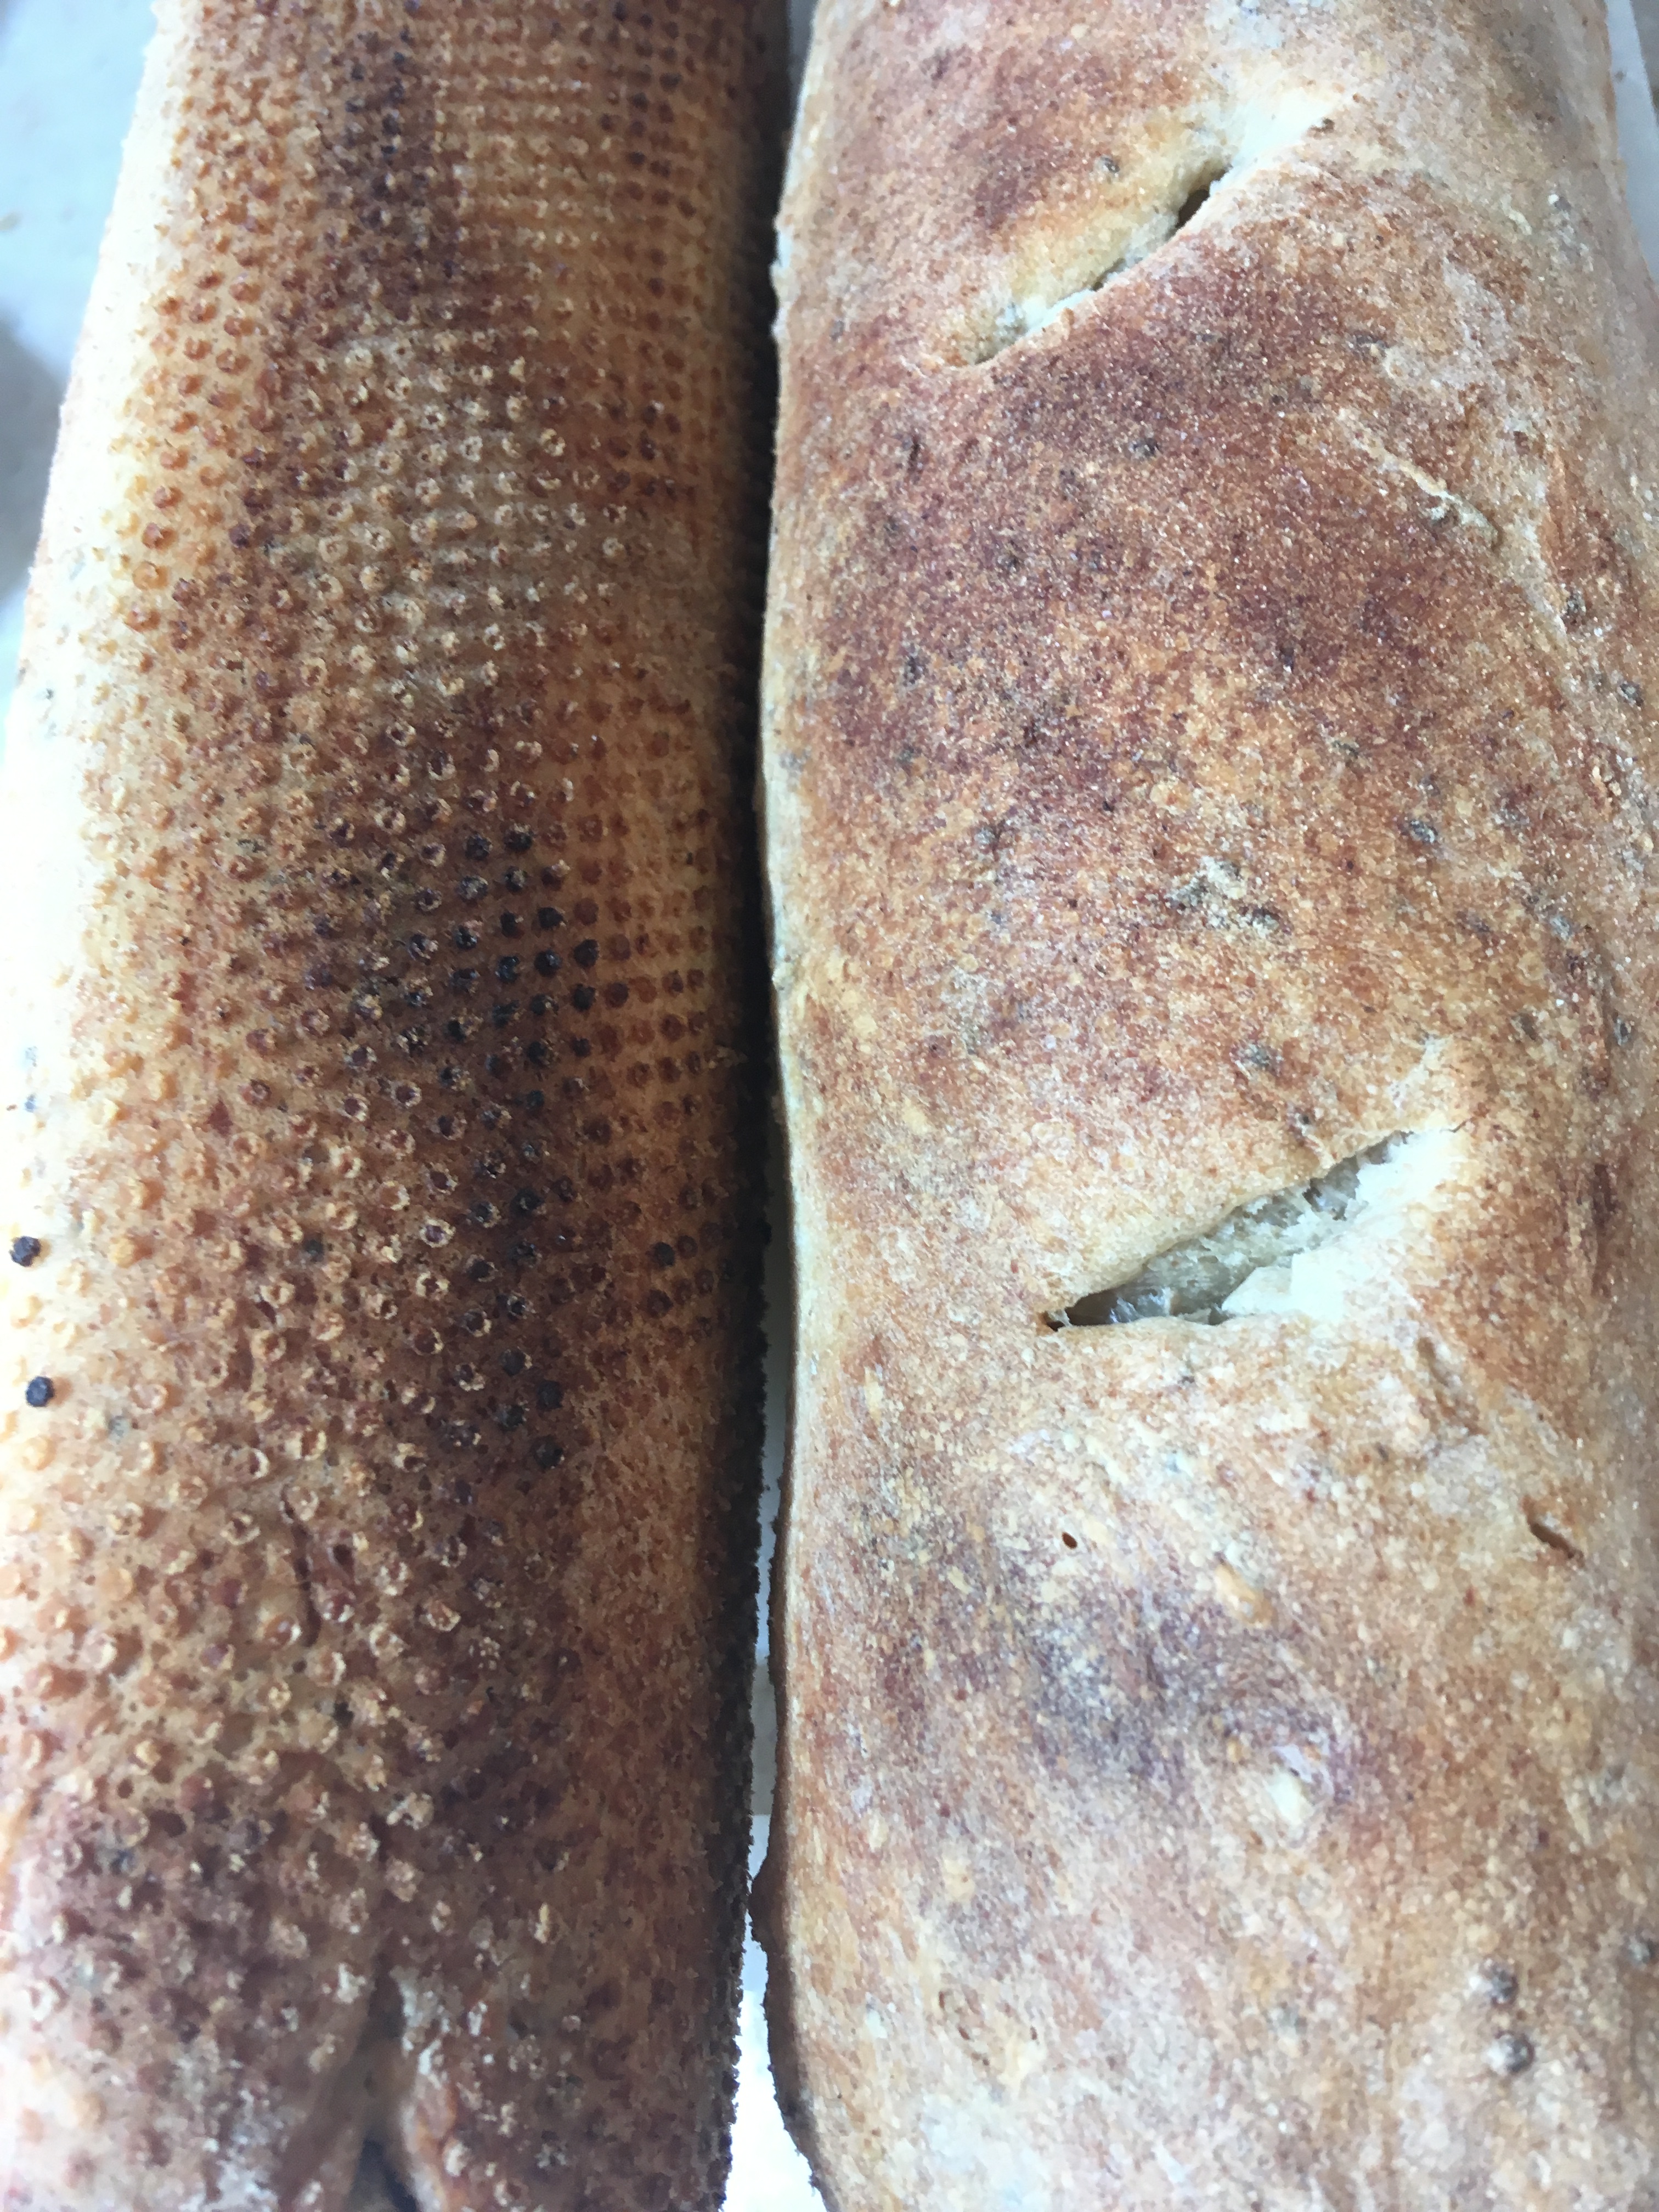
Bake for about 25 minutes and check your bread – it should be a rich golden color. Depending on your oven this may take another 5+ minutes.

IMG-0123.JPG

Left: the bottom, showing bumps from the perforated pan.

To ensure your bread is baked through, check it with a kitchen thermometer – the internal temperature of the bread should be 205-210 degrees F.

IMG-0126.jpg

Nice and craggy with an open crumb

Cool. Slice. Eat.


Blue Streak

Earlier this week, I took a break from my favorite summer activities of wine tasting, beach walks and bread baking to pick blueberries at nearby Gibson Farms. I can’t say I’m the most efficient at this, as I subscribe to the notion of “pick one, eat two”, but both my friend P and I wound up with a solid haul: 9 pounds for her; 7 for me. (Not unlike giving birth, we joked.)

The first acres on this family farm were planted in the 40’s, with more added in the 80’s. The moist, mild climate of the central coast gives the berries their distinctive sweetness, and draws large crowds during the two-week “U-pick“ season.

Berkeley blueberries are Gibson’s current crop. Considered the most popular home garden variety of blueberry, Berkeleys grow well in mild climates. Their medium to large size fruit has great flavor and firmness, as well as a long shelf life, should you happen to not devour the entire crop in one sitting.

Blueberry Berkeley, Vaccinium corymbosum, High Bush Blueberry

You probably know that blueberries are healthy — at least until they turn into a pie!
A few facts:
  • Blueberries contain a plant compound called anthocyanin. This gives blueberries both their blue color (cyan) and many of their health benefits.
  • Blueberries can improve bone strength, skin health, blood pressure, diabetes management, cancer prevention, and mental health.
  • Their fiber, potassium, folate, vitamin B6, and phytonutrient content support heart health. (Fiber helps to reduce the total amount of cholesterol in the blood and decrease the risk of heart disease.)
  • One cup of blueberries provides 24% of a person’s recommended daily allowance of vitamin C.
  • People who use blood thinners, such as warfarin, should speak to their doctor before increasing their intake of blueberries, as the high vitamin K content can affect blood clotting.

blueberries-690072_640

Now, other than merely eating great handfuls, what else can you do? Plenty! — from smoothies to pancakes to salsa to desserts.
Besides the aforementioned pie, I made up a batch of muffins using this King Arthur flour basic muffin recipe and adding 2 cups of blueberries to the dry ingredients before combining with the wet ones. This trick keeps the berries from sinking to the bottom.
IMG-0063.jpg
The muffins would be even tastier with the addition of a streusel topping, but I thought it prudent to skip the additional butter and sugar.
If you are feeling indulgent, though, check out this wonderful Ina Garten recipe from my friend Terry’s blog. Terry will never steer you wrong when it comes to deliciousness!
Enjoy the rest of your week!


For the Love of Carbs #3

Last week we experimented with bread porn.  This week, class entered horror movie territory as we were introduced to… The Slasher!!

The slasher, otherwise known as a bread lame (“lahm”, “lahm-uh”, or as our instructor endearingly pronounced it, “lamb-y”), is a tool used to score dough so that it can expand during baking.  For this session, we improvised with a razor on a stick, which worked pretty well.

unnamed-1

Our final class was perhaps overly ambitious.  We made baguettes, another sourdough, pumpernickel (which we baked at home) and pizza (which we ate during our break).

Baguettes are nearly impossible to bake properly at home since it’s difficult to generate enough steam but we all wanted to try. Abby had made the dough in advance, which looked like Jabba the Hutt as it shimmied its way from its giant pan to the workspace.

IMG-0091

Our baguettes ended up a bit under-baked due to time constraints, and mine got squashed on the ride home. They were tasty, though, and worth another try in the future.

The pizza was fun to make and we’d all worked up an appetite, but I’ll probably stick with Bobby Flay’s recipe. 

Pumpernickel was the most successful, perhaps because it wasn’t rushed.

IMG-0114

The sourdough was good, too.

IMG-0112

Someone asked Abby why she decided to make baking her career, not just a hobby. Her advice: If you lose track of time while you’re doing something, it means you really love it.

We certainly did!

bread class workshop pic (2) (1)

(Abby’s the tall one in the middle, back row. Yours truly is front row left in a scarf.)


For the Love of Carbs #2

Bread class continued with good spirits and much laughter, as we embarked on focaccia, ciabatta and a new method of making sourdough.

IMG-0070

Is that apprehension I’m sensing?

First up, some brave souls brought in their starters for Abby to evaluate. We learned that a starter is ready to use if a small bit floats when immersed in water. Sadly, most of our efforts sank like a stone. (Cue “My heart will go on”.)

To make both focaccia and ciabatta, you begin with a “poolish”, which is pronounced poo-leash rather than rhyming with “foolish” which is how we felt about our sinking non-starters. This is essentially another type of starter that is ready much faster and keeps the dough nice and airy.

Abby kept us on a strict schedule so we could bake these during class. Unfortunately, my benchmate and I made the crucial mistake of flouring the tops of our ciabattas, not realizing they’d be flipped over. (Or possibly not paying attention?) And I opted not to cut the dough into rolls, ending up with a pale loaf bearing more than a passing resemblance to a manatee.

IMG-0074.JPG

Ciabatta in the oven

IMG-0072.jpg

Abby suspects they’re not quite ready.

Our focaccias weren’t much prettier, being pancake-flat. But despite their wonky appearance, both breads were pretty tasty.

IMG-0073

Focaccia resembling paddleboards

The big excitement of the evening came when we learned a new technique that brought out our inner dominatrix. Abby had e-mailed us a video to get us “in the mood”. It’s called the slap and fold method, or, as my friend S dubbed it, Food Porn: You slap your dough on the counter, stretch it up and slap it down again. After about 5 minutes the dough is ready to rest, and so are you.

Who knew that bread making had a racy side? Or that my wardrobe needs a black leather apron?!

                                  (Above, clockwise: focaccia at home – I added rosemary -, ciabatta, sourdough.)

I can only imagine what’s in store for us this week. Stay tuned, dear friends.

For the Love of Carbs

Whoever said, “Man cannot live by bread alone” clearly didn’t live in my house. To that end, I’ve embarked on a series of 3 consecutive weekly classes in bread making, hoping to hone my skills or at the very least make and eat lots of yummy things.

Our first class was Tuesday night. Ten strangers introduced ourselves, commenting on each other’s aprons (the best one: printed with unpronounceable Scottish phrases) and gleaning levels of expertise. We ran the gamut from novice to knowledgeable.

Few things bind people together more than a shared interest; in this case hunger, as the class runs from 6-9 pm and no one had had dinner. As we descended on the snack table – samples of the bread we’d soon be baking – things quickly loosened up.

And then the work began. Abby, our intrepid instructor, handed out sheets of recipes (blue emmer sandwich bread, sourdough and challah) and led us back to the industrial kitchen where we started our first loaf.

First lesson: Measure your ingredients by weight, not volume. Turns out, it’s more accurate since flours vary in density, and it’s easier too. You put a bowl on a scale, set it to zero, and reset it to zero after you’ve added each ingredient. To quote the Monkees, now I’m a believer.

The whole group got down and dirty as we over- or under-loaded our bowls, covered ourselves in flour while dumping it out to re-measure, and got sticky bits of dough in our hair and jewelry. (Note to self: don’t wear a watch.) If you’re a clean freak, this “sport” may not be for you. One tip if you don’t want to keep running to the sink: keep a bowl of extra wheat flour available and rub your hands in it to remove most of the dough.

Then we started kneading. Not only is this a great upper-body workout (3 hours of standing and punching dough should cancel out all those calories, right?), it must be one of the earliest forms of therapy. PINCH! That’s for your annoying neighbor. POUND! That’s for your obnoxious boss. FLATTEN! That’s for every bad relationship you’ve ever had.

We also learned a great trick for preserving your starter if you don’t make bread multiple times a week: Roll some of the sticky starter in wheat flour and keep rubbing until it dries out into a crumbly nub. Abby says it will keep for quite awhile in the fridge (will have to ask how long “awhile” is) until you’re ready to reactivate it.

To keep your starter bubbly and active you’ll have to feed it 1-2x a week. (Starter is a fairly demanding pet but at least it won’t pee in the house!)

Keep it loosely covered in the fridge. A day or two before you plan to bake, dump out about 90% (this takes self-discipline as it seems so wasteful), then add back equal parts water and flour (half wheat/half bread flour) – making at least 130g (1 cup for your recipe plus extra to maintain it). Cover loosely and let it sit out on your counter for 8-10 hours. When the starter gets airy and fragrant, repeat the process.

If you don’t plan to bake for a few days, feed your leftover with more flour than water or dry it out as suggested above.

Exhausted but exhilarated, we left with three batches of dough to bake on our own, plus a dried nub of starter to resurrect. Abby encouraged us to name our starters – hers is Shiva. Since I have a tendency to kill mine on a regular basis, I’m naming him Lazarus.

Verdict:

“Meh” on the blue emmer bread. It was kind of flabby and spongy. A little too much like health food and not enough like “indulgence”.

“Yay” on the sourdough method, although the amount of dough we made was a bit small for my cast iron Dutch oven. And my usual method yields a darker, crisper crust.

“Pretty good” for the challah – I prefer the recipe in the Silver Palate Cookbook. DH says this one reminds him more of a brioche.

Looking forward to this week’s class. Especially the snacks.

p.s. Final tip: Don’t add salt with the rest of your ingredients.  Let dough hydrate (aka rest) for an hour and then mix in the salt.  Apparently it interferes with gluten production. Did not know that.

[main photo source: pixabay.com]


Can This Recipe Be Saved?

Hi everyone, it’s hack time again. First up: cooking.

This weekend, DH and I struggled to fix a chicken dish that was weirdly sweet. After adding multiple ingredients, it was eventually quite good. But it got me researching solutions to some common kitchen problems you might encounter, too.

soup-greens-869075_640

KITCHEN HACK: Adjusting a Recipe

Too Salty

  • If you can rinse off the overly salty ingredient (such as the brine on your olives), that’s an easy place to start.
  • Add a raw potato (you don’t have to cut or peel it) to a liquid dish such as soup or curry. Potatoes will soak up some of the extra salt as they cook and add starch that will further dilute the saltiness.
  • Rice or a small amount of flour are other options.

Too Spicy

  • As with saltiness, adding starch is a quick fix for an overly spicy soup or curry.

Too Sweet

This is a common result when using carrots, red peppers or other vegetables with hidden sugars.

  • Add a squeeze of lemon, lime, or a spoonful of apple cider vinegar.
  • Balance the sweet taste with more seasoning to make the dish spicier.
  • Add a fat such as olive oil or avocado.
  • Try adding tangy yogurt if it’s appropriate for your dish.
  • Add more liquid to dilute it.
  • Avoid adding salt, as it will bring out all flavors, including sweetness.

Too Sour

The best way to counter too much sourness is to add sweet, salty or savory flavors. Think of the way a salt rim balances the sweetness of a margarita, or how adding carrots rounds out the taste of a marinara sauce.

Too Bitter

Leafy greens such as kale, collard, and mustard greens can be overpoweringly bitter. Other ingredients with a bitter edge include coffee, espresso, cocoa and herbs and spices such as parsley, paprika and cayenne (red) pepper.

Bitter is the opposite of acidic or sour so adding vinegar, citrus juice or yogurt can help balance the dish.

  • Squeeze some lemon over sautéed greens.
  • In Mexican cooking, lime helps balance red spices such as chile powder which can taste bitter.
  • Add a dash of grated nutmeg. The nutty taste helps balance other flavors.

HOUSEHOLD HACK: Splinters


wood-1693434_640

Don’t you hate those suckers?! I’ve collected a few tips for your next run-in with old furniture, fences or floorboards. It almost makes me wish I had a splinter so I could try them out. Almost.

  • Baking soda technique
  1. Mix a teaspoon of baking soda or baking powder with a few drops of water until it forms a paste.
  2. Apply the paste to the splinter.
  3. Wait 10-20 minutes until the skin swells a little and the splinter pops out of the skin.
  • Use a piece of duct tape or a drop of Elmer’s Glue to remove the splinter.
  • Soak. Pour some white vinegar into a small bowl. Soak the affected area for 15 to 20 minutes. Once the splinter has risen sufficiently out of the skin’s surface, it should be easy to remove with tweezers.

IMG-0045

FOLLOW-UP: Sicily

IMG-3159 (1)

My friend O suggested a post on my Do’s and Don’ts for next time. If you’re planning a trip to Sicily, here are a few post-vacation thoughts.

What I’d do again

  • Reserve Blacklane upon arrival at an unfamiliar destination. It will cost more than a taxi but the price is established and paid by credit card in advance. Benefits: 1) You won’t be driven all over the place to run up the meter. 2) You won’t have to change money at exorbitant airport rates. 3) Drivers are safe and you can request one who speaks your language. 4) The cars are cleaner and nicer than cabs.
  • Rent apartments instead of staying in hotels. Cooking (and grocery shopping) is fun and cheaper than always eating out.
  • If you plan to drive into the country, consider an apartment rental outside of the city so you can easily get in and out of town.
  • Buy tickets online in advance for popular museums and attractions.
  • Bring a good map and pocket Italian language guide.

What I’d do differently

  • Don’t plan on using Taormina as a base from which to travel to other areas unless you book a tour from town. It’s well located but too hard to navigate in and out.
  • One day is sufficient unless you really like to shop.
  • I’d spend more time in Palermo (better shopping, too).
  • I’d rent a place for a week about an hour’s drive from Siracusa and Noto. I’d rent another place for the second week an hour’s drive from Ragusa and the coast.

FOLLOW UP: Biscuits

IMG-0034

I’m still experimenting, but so far Alton Brown’s recipe checks all the boxes.

Curious about the meaning of the word “hack”? Originating as a computer term, it “… refers to any trick, shortcut, skill, or novelty method that increases productivity and efficiency….”