Monthly Archives: May 2016

Possibly the World’s Best Caramels

Dear Readers, I’d like to introduce you all to my current obsession: the insanely delicious caramels made right here on the Oregon coast and sold online by a young couple with a passion for sweets. If you’ve ever shied away from eating caramels because you found them too sticky, too chewy or were afraid they’d pull out your dental work, I can promise you that these are a perfect, buttery smooth, melt-in-your-mouth consistency.

I asked Skott and Jodi, the creators of Botanical Sweets and Treats, to tell me more about their luscious candy.

basic (18)

How did you get started? “Early on in our relationship, one of our favorite places to visit was Pike Place market in Seattle. We saw past the tourist side of it and enjoyed arriving early and watching the market come to life. We have always loved farmers’ markets and talked about selling at them one day.

We got started almost by accident.

We were visiting family in Idaho and we went to see Skott’s dear Aunt Hazel, the sister to his grandmother (who raised him and was like a mother to him). We told her about our lives on the coast and somehow the conversation turned to all the candy and taffy shops. We started talking about our favorite candy and Aunt Hazel said she loved caramels, but didn’t like chocolate. We asked her if she’d ever had a caramel with sea salt on it. She hadn’t and was very curious about the idea. We told her we would find some at a candy shop when we got home and mail them to her.

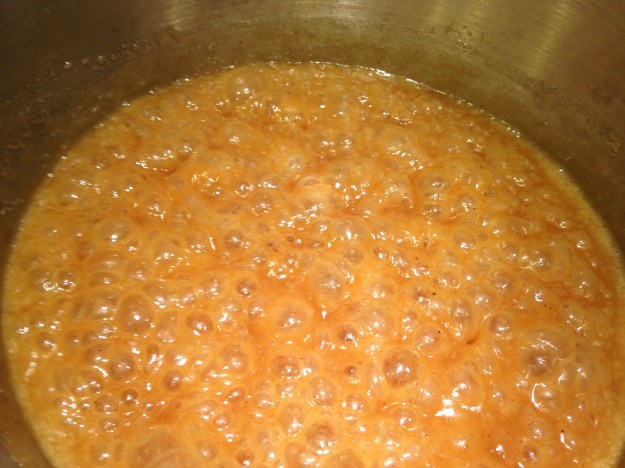
When we arrived back in Oregon, we searched everywhere and couldn’t find any salted caramels that weren’t coated in chocolate. I‘d (Jodi) grown up on a dairy and made caramels for many years in my youth. I decided I would dig out the old family recipe and give it a try. I quickly remembered how much I enjoyed making caramels: cooking that sugar until it seemed it was going to burn, then incorporating cream and smelling those wonderful aromas as the house filled with the sweet smell of caramel.

IMG_1293

We sent salted caramels to Aunt Hazel and brought the rest to work to share with our co-workers. Everyone loved them and wanted more.”

Who does what? “We make a good team. Skott is the creative recipe guy and I (Jodi) manage the business side.”

Your flavors are so unusual! Which are most popular? “We started making our own infusions/concentrates/extracts using dried botanicals such as hibiscus, Earl Grey tea, dried Oregon chai tea, rose petals, lavender buds, and the like. Sea Salt is by far our best seller. We have seasonal flavors that we rotate in and out as well.

Last summer’s best seasonal seller was Cherry w/Lime Salt and our best winter seasonal was Pumpkin Pecan Pie. All of our Christmas flavors sell really well: Candy Cane Crunch, Hot Buttered Rum, and Apple Cider. We introduced Irish Cream last year and that was a big hit, along with Cocoa-dusted Bourbon. Christmas is our busiest season, although we are getting more wedding orders this summer as well.”

IMG_1108

How long have you been in business? “We opened our Etsy shop in November 2013, and did our first show the following April 2014. We have a second Etsy shop (beachwalkerz) and now sell exclusively online.

The response we got at our first show was amazing. We quickly learned that people were not expecting caramels to come in such a variety of flavors, and got asked countless times “What is this, soap?” With the name “Botanical Sweets and Treats” and a green logo background, we quickly realized we needed a major rebranding overhaul. We hired a new logo designer and changed our packaging that first summer. Things went much better after that.FullSizeRender (3)


From day one, the markets were fantastic. We have always loved the energy found at a farmers’ market—the sounds, the smells, the patrons’ excitement as they wander the booths. Skott especially enjoyed talking to the regular customers, the other vendors, and the little kids who would save up their allowance to buy a bag of caramels (he always cut those kids a special deal). He met people from many countries who bought caramels to take back to their families. It’s very exciting to think of the places our caramels have traveled!

The biggest challenge to doing markets along the Oregon coast is the weather. Skott has quite a few memories of people huddled in the booth, waiting out the rain, everyone sampling caramels, laughing, talking, sharing experiences.”

beachwalkerz

Did you ever try something that just didn’t work? “We tried melting dark chocolate into the caramels (versus dipping them in chocolate) and making flavors such as Cherry Chocolate and Mexican Spiced Cocoa. We loved them, our friends loved them, but they just didn’t sell well, especially online. A big challenge with online sales is that people can’t sample before they buy, so they are hesitant to purchase the unknown, funky flavors.

We found out (the hard way), that a beer-flavored caramel is NOT good :-). We tried reducing stout beer and adding it into a caramel. It produces a really sweet, beef-bouillon-flavored candy. Blech! We also tried doing some two-layered caramels like Rum & Cola, and Peanut Butter & Jelly. They were fun to make but very time consuming.

One of our Etsy customers requested a Peanut Butter and Banana flavored caramel. We used peanuts to make an extract, boiled banana in water and made an amazing Elvis-inspired caramel. It was actually quite delicious!”

What are your plans for the future as you become more successful? “We have worked very hard to get back and live at the coast that we love so dearly (we relocated here from Wisconsin five years ago) and we don’t want to leave the area. This poses many challenges from a business standpoint, the main ones being commercial kitchen availability and distribution.

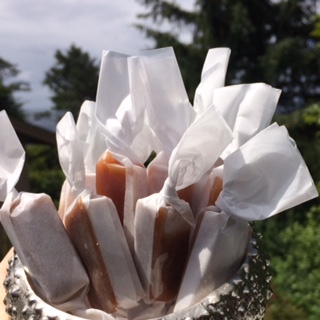
Last year we really maxed out on production capabilities. We cook in small batches. We cut, wrap, and bag all by hand. Our online sales have continued to grow, to the point that we’ve stopped attending the markets.

IMG_2009

After meeting with a local investment group we’ve decided that we want to keep control of our company, even if that means keeping it smaller at this point. Caramels are best when fresh; they don’t have a super long shelf life. Even though they never really “go bad”, they lose their brightness after 3-4 months. And we don’t want to start adding a bunch of chemicals to increase shelf life!

So in a nutshell, our plans are to continue to grow our online sales via Etsy and maintain our handcrafted quality rather than becoming automated. We have a lot of fun making caramels together!”

Special Offer Just for OFH Readers! I promise you’ll have at least as much fun eating these caramels as Skott and Jodi have making them. They’ve generously offered us a special discount coupon to use when you shop online. Enter BLOG10  at checkout to save 10% on your order.

My personal recommendations are Original, Sea Salt, and whichever coffee flavor is available. But honestly, they are all wonderful!! (And, by the way, this is not a sponsored post; I’m just a fan!)

Bullies, Then and Now

I’d already started writing this when a wonderful blog landed in my Inbox. I’d been thinking about the ways life keeps tossing bullies in our path – just when we’re beginning to believe we’ve outgrown the past. Clearly, I’m not alone.

Back in 7th grade, I was frequently tormented by the mean and massive football player who sat next to me in Homeroom. I was shy, bookish and definitely not cool, having parents who eschewed everything that was considered fashionable in the 1960’s.

In junior high on Long Island, you had to have Pappagallos, low-cut flats that came in a rainbow of colors, were worn by all the popular girls, and that I was not allowed to wear because, according to my mother, they didn’t give my feet enough “support”. Instead I was doomed to clunky Mary Janes, which prompted endless witticisms from “Football Fred” ridiculing my old-lady clodhoppers.

Adding to my not-coolness was not being allowed to shave my legs. Having sparse, white-blond body hair I thought I could get away with this, but Fred never missed an opportunity to drop a pencil or notebook under my desk and retrieve it with a snarky whisper about my “spider legs”.

Happily, life goes on and we all grow up. Sort of. Because at my first job, I discovered a new species: the work bully.

My first boss, “Andy”, was an affable ex-military guy whose management style was a type of hazing designed to toughen me up. Although Andy wasn’t overtly insulting, he often withheld information that could make my job easier or more efficient. This resulted in a colossal waste of time and energy that, more than once, reduced me to tears of fury in the ladies’ room.

One of my early tasks as a junior art director was to recommend which artists we should contact for a particular job. I had no idea how to begin looking, and there was no Internet with which to research this. I asked Andy for direction and he told me to go figure it out. I suggested that if he’d simply tell me where the information was I’d never have to ask him a second time, but he walked away.

Hours later, I discovered that Andy already had files of cards from all the artists’ representatives, neatly catalogued by style from realistic to cartoon. He must have thought sending me on a wild goose chase would build character. Instead, it built resentment. We did, in the end, become good friends—once I was no longer working for him.

I next crossed swords with a burly, perpetually scowling television producer I’ll call Phil, who refused to partner with me on a commercial because I was too “junior”– never mind that it was one I’d written and it was therefore my responsibility to follow through.

Phil insisted he’d only work with my boss. After running up and down the stairs multiple times to relay this to my supervisor, who kept sending me back to negotiate further, I finally closed the door (hard!) to Phil’s office and said, “Look, I don’t want to work with you any more than you want to work with me, but we have a job to do so let’s get on with it.”

I never had trouble with him again – and I learned the important lesson that the only way to get someone to stop bullying you is to stand up to him or her and show them they don’t intimidate you. Even if you’re in your twenties.

I wish I could say that those were the only bullies I ever encountered. One of the worst was a poisonous co-worker at my last agency job. She ruled her stable of sycophants not by fear or obvious intimidation – she appeared to be friendly and fun – but by creating a merciless clique of who was “in” and who was frozen out. You could get on her s***list in a nanosecond for politely declining to drink on the job, as she did every afternoon beginning at 4 pm. Those who were “out” were viciously gossiped about, maligned to senior management and made so miserable that, years later, they still shudder when they hear her name.

Bullies, of course, reside in everyday life outside of work, too. There’s the woman who makes some guy’s life hell when he tries to end a relationship. The receptionist who won’t let you speak to your doctor. The guy in the Homeowners’ Association who insists you can’t replace so much as a doorknob without his permission. And the supermom at the PTO who tries to guilt you into doing her bidding by making you feel like a bad parent just because you have a full-time job.

Moral: Life is eternally 7th grade. But now you have the tools—wisdom, kindness, a good lawyer on speed dial—to fight back. And sometimes, growing up really is the best revenge.

Sweet on Sourdough

As soon as we arrive at our summer place in coastal Oregon, I’m seized with an uncontrollable urge to bake. I don’t know if it’s the tang of the sea air, the crisp nights, or the mist that makes everything look a bit magical, but something makes me want to light a fire, curl up with a good book and wait for dough to rise.

Every summer begins with a new batch of sourdough starter; it’s one of the first things I do after dusting away the winter cobwebs. This is part ritual, part challenge (every loaf is a little different because I’m truly an amateur) and partly the desire to fill the house with the intoxicating aroma of fresh bread.

Sourdough is one of the oldest types of bread, dating back to the Egyptians in 1500 BC. French bakers brought sourdough to California during the Gold Rush and it’s been associated with San Francisco ever since. When you mix flour with water and expose it to air, wild yeasts join the party, converting the natural sugars in flour to acids that impart a sour flavor. As the yeast interacts with the flour mixture it produces carbon dioxide, the cause of the active bubbles that make bread rise and create its distinctive holes.

Like a beloved pet or houseplant, sourdough starter needs to be “fed” regularly; otherwise it gets stale and dies. Since we’re only here for four months a year, I can’t keep mine going indefinitely. (I don’t suppose TSA would be too thrilled if I brought a jar on plane rides back and forth!) Plus, I sometimes want to eat something else. But if you’re willing to feed it every few days, you should be able to keep your starter going for months or even years, as professional bakeries do.

The first bread you make will be rather mild; it will develop its unique-to-you flavor after a few batches, when the wild yeasts that grow in your climate have a chance to develop. It will also become more ragged and hole-y as the starter matures.

Every bakery (and baker) has a special recipe and process. I’ve combined and adapted elements of several recipes, including ideas from the wonderful The Best Bread Ever cookbook and the legendary Tartine’s. Although there are a number of steps and it takes awhile, the following is pretty much foolproof (though I’ve had some batches turn out mysteriously dense)– you’ll quickly develop a sense of how the dough should look and feel. Have fun!

What you’ll need:
• Flour (rice, whole wheat and bread flours)
• Container for starter, a food processor and a mixing bowl
• Cast iron pot with lid, about 10” diameter
• Thermometer that goes up to 220°F
• Spray mister (Pylones makes a cute one)

Sensational Sourdough

STEP ONE: Starter
In a clear container or bowl, mix 2 cups of unbleached bread flour with 1½ cups of warm water and stir well. (I use a rectangular container about 5” square wide and 6” tall because it stores well in the fridge.) Cover with cheesecloth and leave near an open window.

STEP TWO: Wait
Stir the mixture twice a day for 2-3 days; then add ½ cup of whole wheat flour, ½ cup of bread flour, and enough water to restore its original consistency. Continue stirring another day or two until the starter develops a layer of foam about an inch thick. The bubbles will be very active at this point and the starter will be stretchy and fluid.IMG_1059

STEP THREE: Dough (Warning: this is about a 5-hour process!)
1. In a food processor, combine 1 cup of starter, 1 cup of warm water, 3½ cups of bread flour and 1 teaspoon of salt. Pulse for 20 seconds, adding a bit more water if the dough doesn’t come together in a ball or seems dry and crumbly. Let it rest for 5 minutes, then pulse for another 25 seconds. Transfer the dough to a bowl and let it rise for 30 minutes in a warm or sunny part of the room.
2. Dip your hands in water and, going section by section, pull one quadrant of the dough to stretch it over the rest. Repeat the action for all four “edges” of the ball of dough. Put the ball back in the bowl, cover with a towel, and let it rest for 30 minutes.
3. Repeat the folding/stretching action every half hour for a total of 6 times (3 hours). By the end of the 3 hours, the dough will be much softer and should increase in volume about 20-30%. If not, continue the folding/rising process one or two more times.


4. Transfer the dough to a work surface and dust with flour. Flip the dough over so the floured side is on the bottom. Using a smooth rolling motion, pull the corners of the dough out and up towards the middle as you roll it into a taut round ball. Cover with a towel and let it rest for 30 minutes.
5. Line an 8-10” bowl with a fresh towel. Combine ½ cup each of whole-wheat and rice flours in a separate container and sprinkle the towel generously with some of the mixture. Reserve the rest.
6. Uncover your dough. Dust the top with whole-wheat flour and flip it over so that the floured side is on the bottom. This will become the crust.
7. Beginning with the side that’s facing you, pull out the bottom two “edges” of the ball and stretch them up to the middle of the dough. Next, pull the two “sides” of the ball and stretch them over the center. Finally, lift the top two “edges” and stretch them over the previous folds. (Imagine folding a piece of paper: bottom corners up, sides in, top down over everything)


8. Flip the dough over and roll it into a smooth, taut ball. All the folded sides will be on the bottom. Don’t worry that the seams are still visible!
9. Transfer the dough, seam side up, to the prepared bowl. Sprinkle some of the rice/whole wheat mixture on top, fold the towel lightly over the dough, and put it in the fridge.

STEP FOUR: Wait overnight.
Alternatively, let the dough rise in a warm (70-80°F) environment for 3-4 hours. But it tastes better after a long, slow rise of 12+ hours.

STEP FIVE: Bake.
1. Take the bowl out of the fridge and let the dough warm up to room temperature.
2. Put a cast-iron lidded pot (about 10” diameter) in a cold oven and preheat to 500° F. Wait 30 minutes after the oven reaches this temperature before proceeding.
3. Carefully take the dough out of its bowl, place it on a counter and dust the top with some of the rice/whole-wheat mixture. Using a sharp knife or razor blade, slash the top of the bread in a few places. This will allow air to escape as the dough rises in the oven. Be careful not to press down too hard; you want to maintain the round shape.


4. Using oven mitts, take the hot pot out of the oven, remove the lid and gently drop the dough into the pot. Replace the lid and put the covered pot back in the oven, reducing the heat to 450°F.
5. Bake for 20 minutes. Open the oven door, remove the lid and spritz the oven a couple of times with water to create some steam. Spritz again after another 2 minutes. Continue baking (uncovered) for about 20-25 minutes until the crust is a dark golden color. Check the internal temperature: the bread is fully baked when it’s 205° to 210°F at the thickest point.


6. Cool the bread on a wire rack for at least 15 minutes before slicing.

Yield: one large loaf.

Notes:
3 shallow, vertical slashes will create an oval shaped bread. A criss-cross pattern creates a round loaf.

Keep feeding your starter every few days to a week: Add 1 cup flour + warm water to maintain the original consistency.

A quick share

I love this blog, and the recipe looks fantastic, so I wanted to share the link with all of you:

Sables Bretons: French salted butter cookies

Go to the Web site for all his photos and details.

Sables Breton
About 30 cookies

Adapted from Little Flower Baking by Christine Moore

More than other types of cookie, these are quite sensitive to being overbaked. Some might like them darker, but I prefer mine a little less, which allows for the flavor of the salt and butter to come through. I recommend baking them one sheet at a time on the middle rack of the oven. Even in a convection oven, I find if you bake these on the lower rack, they’ll cook too quickly on the bottom.

It helps if you can make room in the refrigerator or freezer before you start rolling the cookies so you chill the baking sheets with the unbaked cookies on them. Chilling them makes it easier to score them with a fork, but if you work fast – like I did – you can probably get away with not chilling them.

I reduced the baking powder in the original recipe, but it’s still imperative that you use aluminum-free baking powder because these have a bit more leavening than other cookie recipes. Regular baking powder has a tinny taste, and you want to avoid that in these buttery treats.

2/3 cup (5.2 ounces, 150g) best-quality salted butter, at room temperature
2 teaspoons flaky sea salt, such as fleur de sel or Maldon
4 large egg yolks
1 cup (200g) sugar
1 3/4 cups (210g) all-purpose flour
4 teaspoons aluminum-free baking powder
1 egg
1 teaspoon of water
1. In the bowl of a stand mixer fitted with the paddle attachment, or by hand in a bowl with a sturdy silicone spatula, cream the butter and salt together on low speed until smooth, about 30 seconds.

2. In a separate bowl, whisk the egg yolks, gradually adding the sugar while whisking, until the yolks are light and fluffy – about a minute. With the mixer on low, add the egg yolks to the butter, stopping the mixer to scrape down any butter clinging to the sides so it all gets incorporated.

3. Sift together the flour and baking powder in a small bowl, then stir that into the creamed butter mixture until it’s completely incorporated. (Don’t overmix it.)

4. Pat the dough into a rectangle about 1-inch (3cm) thick, wrap in plastic, and chill for an hour. (The dough can be made up to five days in advance, and stored in the refrigerator.)

5. Line two baking sheets with parchment paper. Have a pastry scrape or thin metal spatula handy.

6. Cut the rectangle of dough in half and place one piece between two large sheets of parchment paper. Roll the dough until it is between 1/3- to 1/2-inch (1,25cm) thick. Peel off the top piece of parchment paper and, using a 2-inch (5cm) round cookie cutter, cut out circles of dough, place them on the prepared baking sheet at least 1/2-inch (2cm) apart. You may need to coax them off the parchment with the pastry scraper or spatula.

7. Roll the second piece of dough, cut out circles, and put them on the other baking sheet. (Scraps can be gathered up and rerolled to make additional cookies.) Chill the baking sheets of cookies in the refrigerator or freezer until firm.

8. To bake the cookies, preheat the oven to 350ºF (180ºC). Adjust the oven rack to the middle of the oven.

9. Beat the egg in a small bowl with the teaspoon of water. Remove one sheet of cookies from the refrigerator or freezer. Brush the tops of the cookies with the egg wash then use a fork to cross hatch a pattern on the tops of the cookies. Bake the cookies until the tops are golden brown, about 15 minutes, rotating the baking sheet in the oven midway during baking.

10. Remove the cookies from the oven and let cool on a wire rack. Brush the second baking sheet of cookies with the egg wash, rake a pattern across the tops with a fork, and bake them.

Storage: The unrolled dough can be chilled for up to 5 days or frozen for up to two months. Once baked, the cookies will keep for up to four days in an airtight container.

Diary of a Photo Facial

If time has etched its passage with dark spots, broken capillaries and other evidence of sun damage, you may want to consider having a photo facial at your dermatologist or plastic surgeon’s office. I’ve been going every six months for a couple of years and, while it’s not what anyone would call a relaxing spa treatment, it’s definitely effective.

There are several different types of machines; each delivers targeted heat and light to pigmented areas. Stephanie, my esthetician, explained that her office uses BBL (Broad Band Light, made by Siton) because it provides a full range of options for true customization. Many other machines are pre-set, making them somewhat more limited.

Photo facials target the pigment in the skin to lighten areas of damage. The combination of light and heat also strengthens and builds collagen, the main protein in your body that supports your skin and diminishes over time.

Different skin colors require different treatment, and in fact African American skin, which obviously has the most pigment, would burn if subjected to pulsed light. The darker your skin, the more conservative your facialist will be with the setting. Pale and freckled skin like mine can tolerate the strongest heat and often has the most visible results because the initial contrast is so noticeable.

Make sure to discontinue the use of retinol a week before treatment, as it will make your skin overly sensitive. You may also want to stop using glycolic acid, although that’s less of an issue. I also recommend taking acetaminophen before your session.

Here’s what happens:

  1. Stephanie takes a “before” photo with all my spots on display. Depressing!
  2. I lie down on the padded bench and tuck in my shirt collar since she’s going to zap my neck and chest. (Your derm might have you take off your top and cover you with a towel.)
  3. After cleansing my skin to remove all traces of sunblock, moisturizer etc., she puts eyeshades on my eyes to protect them from the intense light.
  4. She then spreads ultrasound gel (cold and thick) on the areas to be treated. The gel acts as both a heat conductor and protector against burning.
  5. YOWZA!! Stephanie carefully, thoroughly and painfully zaps each spot with a pinprick of bright light. Some people describe it as like a rubber band snapping against your skin. I won’t lie… it hurts, though some places are less sensitive than others and the sensation lasts a fraction of a second. Again, depending on your skin tone and texture, it might not be as uncomfortable for you as it is for me. For instance, it doesn’t hurt much on my chest or hands.

When the session is done, Stephanie wipes off the ultrasound gook and lightly spreads on a soothing lotion. My face is a bit red and swollen, so I pop some oral arnica tablets and apply arnica lotion when I get home (make sure you don’t go near your eyes since the fumes are strong.) When more heat is used, the more swelling you can expect; it will subside after a few days at the most. Cool compresses help too.

Spots are darker immediately after treatment, but you can easily cover them with makeup. The first time I did this I was noticeably blotchy, especially on my hands; with regular sessions it’s not nearly as obvious. Don’t expect to see results for at least three or four weeks. The dark spots will crust over and fall off on their own. Meanwhile, be extra vigilant about using a broad-spectrum sunblock (at least 30 SPF)– which you already know you should do anyway, right?

By the way, pulsed light doesn’t go deeper than the top layer of skin, so it will not affect fillers or other deep-layer injectables.

Don’t expect miracles and I think you’ll be pleasantly surprised at how nice you look with fewer of those nasty age spots!

Ms. StrangeLove: or How I Learned to Stop Worrying About My Kids

Sorry; this is an outright lie. If you’re a parent – whether to a child, dog, or gerbil– you know there’s always something to worry about. What’s more, what you worry about is a moving target: Just when you think you have a handle on the problem, something you didn’t anticipate rears up to scare the living crap out of you.

The Seven Stages of Anxiety

Infancy: Colic; SIDS; will I drop the baby on its head? Should we decorate the nursery in black and white for stimulation, gendered colors since you’re tired of people asking if it’s a boy or a girl and besides you actually like pink or blue, or a neutral color they can “grow into”; your baby’s measurements vs. the norm. (Note: The 20th percentile daughter I feared would be abnormally short has grown into a very slim 5’7”.)

Toddler: How to keep them from climbing on tables; how to keep them from pulling off all the baby-safe outlet covers and sticking wet fingers into them; how to stop them flinging food all over a restaurant while shrieking hysterically; whether they’re talking on schedule (how many five-year-olds do you know who don’t talk?); potty training (how many eight-year-olds do you know who aren’t potty trained?). Deep breath.

Kindergarten: Biting: It’s the law of the jungle—your kid is either a biter or a bitee; falling off the monkey bars and cracking their skull open; being “behind” the rest of the class; whether my son would have permanent nerve damage from putting his hand on the broiler-cooktop at Benihana. (He didn’t, though he still has issues with impulse control.)

Elementary school: Bullying; not having friends; having the wrong kind of friends; doing their homework; remembering to actually take said homework out of their backpack and turn it in; whether they suck at sports; ADHD; their exclusive diet of pizza, soda and candy.

High School: Drugs; sex; cutting class; smoking; not being able to get into college.

College: Drugs; sex; cutting class; smoking; not being able to stay in college.

Early adulthood: Not finding a job; not staying in a job; staying in a dead-end job; dating the wrong partner; dating the right partner but not committing; living too far away; living too close and wanting to stop by when it’s really inconvenient; not calling enough; calling whenever you’ve settled into a quiet night watching your favorite TV show; not telling you what’s going on in their lives; telling you too much about what’s going on in their lives and giving you new things to worry about.

The point is: For better or worse, your children have their own destiny. Once you’ve safely guided them through the early years, keeping them in one piece with a minimum of trauma and hopefully imparting a set of values and a sense of humor so they can make good decisions, your job is done.

I’ll always worry, but now that my kids are 25 and 30 I try to keep it to myself. Some days are more successful than others. Happy Mother’s Day!