Tag Archives: wordpress

Who’s Scared of Friday 13th?

(Adapted from alltimelists.com. Interesting stuff!)

You’ve surely heard that Friday the 13th has a bad reputation. Many people consider it to be one of the most dangerous days of the year and conduct their business throughout the day with great caution – whether traveling, working, meeting friends or dining with family. Whether or not you’re superstitious, here are ten fun facts about this date.

10. Friday and 13 Are Linked to the Crucifixion of Jesus

Phillips Stevens Jr., a well-known anthropologist, says that people started fearing Friday the 13th during the Middle Ages.

He says, “There were 13 people present at the Last Supper and Jesus was said to be the 13th. The Last Supper was on a Thursday and the next day was the day of the crucifixion.”

When the number 13 and Friday come together, people fear it as double trouble. Very tall buildings usually don’t have a 13th floor. It is also considered unlucky to sit thirteen people at a table and some airplanes skip the 13th row.

 9. Friday the 13th and the Calendar

Top 10 Friday the 13th Facts - Repetition in Calendar

Is there a divine pattern? Whenever January 1 falls on a Thursday, the months of February, March and November all have a Friday the 13th. This will happen 11 times in the 21st century.

Our current cycle began in 2009, when Friday the 13th occurred in February, March and November. It also happened in 2015. However, it won’t happen again until 2026, after which you will have to wait until 2037 — another 11 years — for the trifecta.

 8. Historical Associations

top 10 Friday the 13th Facts - Other Numerological Numbers

Some contributing factors to the avoidance of the 13th are historical as well as biblical. For example, the number 12 is considered as a whole in numerology: the twelve tribes of Israel, the 12 apostles of Jesus and then the 12 successors of Muhammad in Shia Islam. Anything over that number is considered “un-whole” by numerologists.

Another theory is mentioned by author Dan Brown in his book about the crusaders and the Knights Templar. On October 13, 1307, France’s King Philip IV ordered the arrest of hundreds of Knights Templar and many were murdered throughout Europe. Another reason, bound in blood, that people fear Friday the 13th.

7. It Became Popular in the 19th Century

Top 10 Friday the 13th Facts - Became Popular in the 19th century

Much of the paranoia started in the 1800’s. Henry Sutherland Edwards wrote in his 1869 biography of Giochino Rossini (a leap year baby, by the way), that “He was [always] surrounded with friends. He considered [the number] 13 to be unlucky until his last day and he also passed away on Friday the 13th.”

Later, a novel published in 1907 titled Friday, the Thirteen by Thomas W. popularized the idea, inciting superstition throughout American culture.

 6. Alfred Hitchcock Was Born on Friday the 13th

top 10 Friday the 13th Facts - Birthday of Alfred Hitchcock

Who isn’t familiar with Alfred Hitchcock? The legendary director was born in August 13, 1899 and made his directorial debut in 1922 with a movie called Friday the 13th. However, the movie didn’t gain much popularity and suffered from financial issues.

Other well-known celebrities who were born on Friday the 13th include actresses-turned-designers Ashley and Mary Kate Olsen, playwright Samuel Beckett and former President of Cuba, Fidel Castro. One could argue that it hasn’t been unlucky for them!

5. Terrible Things Happen on Friday the 13th

Some people deny that Friday the 13th is unlucky but there is a lot of evidence to back this up.  For example, the Nazis dropped a bomb on Buckingham Palace on September 13, 1940 and the day was a Friday. Also, consider the Knights Templar and their fate on Friday the 13th.

On October 13, 1989, the stock market suffered a massive crash. That day happened to be Friday the 13th. It is considered the second most damaging day in stock market history. There have also been a considerable number of plane crashes on Friday the 13th.

 4. It’s a Lucky Number for Taylor Swift

Top 10 Friday the 13th facts - Taylor Swifts Lucky Number

Despite the bad things that have happened on this fateful day, it’s still a good luck charm for singer Taylor Swift. She is so obsessed with this number that she paints 13 on her hand every time she does a show.

She explains the significance of this day in her life with the following words: “I was born on the 13th. I turned 13 on Friday the 13th. My first album skyrocketed in 13 weeks. My #1 song has a 13 seconds intro. I have always won an award when I am sitting in the 13th section or row M, which is the 13th letter of the alphabet.”

3. A Group Was Formed to Debunk the Superstition

In the 1880s, the Thirteen Club was formed to debunk the myths surrounding this fateful day. The group gathered on every 13th of the month and conducted experiments. They would throw salt and break mirrors in an attempt to get a reaction from supernatural powers. They would also note the number of people who died that day.

The group eventually gained great popularity and grew to have 400 members, including a number of U.S. Presidents.

2. The Fear of This Number is Psychological

Top 10 Friday the 13th Facts - Fear of The number is psychological

The correct word to describe fear of the 13th is “triskaidekaphobia”.

Some of the problems people face on this day range from relatively low anxiety to full-blown panic attacks. Because of all the distractions Friday the 13th causes, millions are lost each year for companies around the world. The National Geographic states, “It’s been estimated that about $800 to $900 million are lost in business on this day because people don’t fly as they [normally do].”

1. Good Things Happen, Too

Top 10 Friday the 13th Facts - Good Things that Happened this day

Good things happen on this day, too, although they don’t get as much attention. For example, the Hollywood sign — one of the most powerful and recognizable images around the world — was unveiled on Friday the 13th, 1923.

Whether you’re superstitious or not, you can’t deny that it’s a significant day. Hope yours is a lucky one!

Hump Day Hack: Tangled Chains

HOW TO UNTANGLE NECKLACES and FIX KNOTS IN A CHAIN

IMG-0390

TIP ONE Apply a drop of baby oil to the knot(s). This will make the chain slippery and the knot will come undone more easily when you pull on it. If the knot is still tight, roll it gently with your fingers until it begins to loosen. Once you’ve untangled the knot, rinse the baby oil off your necklace using a mild liquid soap.

TIP TWO Insert a straight pin into the center of the knot, then slowly wiggle it around, gently lifting/pulling it upwards. You may need to do this a few different ways to loosen particularly tight tangles. To avoid breaking your necklace, be careful not to pull too hard or catch any openings in the chain.

TIP THREE Sprinkle baby powder on the knot. This will act as a lubricant and make the chains easier to separate. Once you’ve untangled the knot, rinse off the baby powder  using mild soap.

IMG-0391

TIP FOUR To prevent tangling, store long chains on a multi-hook hanger in your closet.

IMG-0394

Ah, if only it were this simple to untangle ourselves from dead-end jobs, family drama and bad relationships!


Beauty Adventures: Vanity and Necessity

This getting older thing seems to require ever-greater vigilance. The wear and tear of sun exposure and general activity caught up with me recently, resulting in a few rounds of sclerotherapy and in-office surgery for a squamous cell (non-melanoma) carcinoma.

green-2977164_640

Prominent veins are much prettier on leaves

First, the vanity part: sclerotherapy.

I’ve made peace with my legs’ freckles, moles, scars and other mementoes of time but one thing was really bothering me: clusters of ugly spider veins around my ankles that had appeared over the past few years. (Thanks, gravity!)

Since boots are not a year-round option and the distracting power of red nail polish only goes so far, I finally decided to do something.

Sclerotherapy is commonly used to treat varicose veins or spider veins. Depending on the types of veins affected, lasers and other methods may be indicated. In my case, sclerotherapy was the recommendation and – spoiler alert – it has made a difference.

The procedure is non-surgical, doesn’t require anesthesia, and, in most cases, doesn’t require any special preparation. Your doctor injects a solution (called a sclerosant) into the blood vessels or lymph vessels, which causes them to swell and cut off the flow of blood or lymphatic fluid to the veins, which in turn makes them shrink. The practitioner can actually see them disappear – how cool is that?

During the treatment, you lie on your back with your legs up. After cleaning the area, the doctor injects the vein with the irritant. You may feel burning, tingling, or nothing at all. In my case there was some stinging but it wasn’t too bad. When the injection is complete, the doctor massages the area to prevent blood from re-entering the vein. Depending on the area being treated compression socks may be helpful afterwards.

After treatment, you need to remain active to prevent blood clots from forming, and avoid sunlight, which can cause dark spots at the treated area. Other than some soreness, redness and bruising at the injection site, recovery is easy.

 Research suggests that sclerotherapy effectively removes spider veins in 75-90% of cases, but typically requires multiple treatments. It took me 3 sessions to remove all but the most visible cluster, which has not gone away completely but is much lighter. Unfortunately, the procedure isn’t covered by insurance and since standing and walking put pressure on the veins, they’ll probably come back eventually.  I’m hoping it takes a few decades.

Necessity: skin cancer prevention

Being fair-skinned and paranoid, I’m vigilant about sun block and see my dermatologist annually for a full-body skin check. This time, I called her attention to a small but tenacious spot on the back of my hand and she agreed that a biopsy should be done. Most red spots resolve within a month (a bit longer as we get older and our skin takes more time to heal). Anything that doesn’t go away should be evaluated.

Turns out I had a squamous cell non-melanoma carcinoma, the second most common form after basal cell carcinoma. Not life threatening, but not something you want to ignore, either. We scheduled surgery for a couple of weeks later.

Skin cancer is the most common of all cancers; each year in the U.S. nearly 5 1/2 million cases of non-melanoma skin cancer are treated in more than 3.3 million people. It’s also the easiest to cure when diagnosed and treated early. The head (particularly if you have thinning hair), face, tops of the ears and back of the hands are especially vulnerable. Hats and gloves, people! And wear sun block every day, including driving and swanning about in your corner office with the big windows!

Dermatologists used to focus on brown, unevenly shaped or mottled moles. But scientists have now learned that melanomas can also be pink or red. Be on the lookout for areas that are rough, red and raised. Often you’ll detect anomalies more by feel than by the way they look.

Pre-op: The biopsy has removed most of the problem already, since squamous cells are in the top layer of skin. The pre-op prep includes avoiding blood thinners such as ibuprofen, certain supplements and alcohol the week before, plus cleaning the area in advance with an over-the-counter antibacterial liquid.

Day Of: First, the surgical area is numbed with a lidocaine injection. Mine is on my wrist so the incision is lateral and should be hidden by all the other creases. Surgery isn’t painful and I only need acetaminophen a couple of times in subsequent days.

A Week (Plus) Later: A nurse at the derm’s office removes the stitches and applies three Steri-Strips. These fall off after another week. Three weeks post-op, the back of my hand is still sore and puffy but is slowly improving.

After-care: Dr. D recommends Gold Bond Strength and Resilience to moisturize skin, Anthelios 60 sunscreen, and Serica for scar improvement – it’s much easier to apply this gel than bulky scar strips. I’m also trying it on last year’s bunion scar to see if it helps.

IMG-0386

Dr. D has also suggested I try nicotinamide (B3) supplements. In the recent ONTRAC study, oral use significantly reduced the risk of melanoma in patients who’d had two or more precancerous basal or squamous lesions.

IMG-0375

I’m taking 500 mg twice a day and will start seeing my derm twice a year from now on. I’ll also be ordering Anthelios by the truckload.


Charleston, Va “Benne”

How is it our last day already?! We cram a lot into our final historical dive, as well as two excellent meals.
First, a morning ferry to Fort Sumter, the strategic site where the American Civil War began. The excursion takes about two hours: a 30-minute ferry ride to and from the fort and 60 minutes on the island. During the ride, a recording describes various points of interest and the history of Fort Sumter and Charleston Harbor. Best part: we see dolphins off the side of the boat.
IMG-0272
Construction of Fort Sumter was still underway when South Carolina seceded from the Union on December 20, 1860. Despite Charleston’s position as a major port, at the time only two companies of federal troops guarded the harbor.
The Confederacy (500 soldiers) captured the fort in a short but intense artillery bombardment of the US Army garrison (80 soldiers) on Apr 12 – Apr 13, 1861, following months of siege-like conditions. The Confederate victory marked the official start of this bloody war, although there were no casualties in this battle.

 The site includes a museum which details these events.  As a lifelong Yankee/Northerner, it’s fascinating to read the Southern perspective on slavery and other issues of the day. IMG-0273

We get back by noon and Uber over for lunch at the deservedly popular Rodney Scott’s BBQ. Our friends are eager to try the ribs, which could feed a modern-day army and are as fabulous as anticipated. Pulled pork is pretty great, too. Rodney stops by to say hi — we’d talk longer but our mouths are full!

IMG-0289

IMG-0290IMG-0291Next up: the McLeod Plantation, which takes an unsparing look at all aspects of plantation life. The plantation was built on the riches of sea island cotton – and on the backs of enslaved Gullah men, women and children. The stories of these families – black and white, enslaved and free – are vividly told through narrative and photos.  It’s sobering and terrible, yet the triumph of survival is ultimately uplifting.IMG-0293It’s 5:00 somewhere — oh, here! — so we conclude our last day with drinks and dinner. We discover a great bistro and bar right near the restaurant we’ve reserved.

The Ordinary is, in my opinion, rather ordinary.  Food is good but nothing special, the cavernous space (a former bank) is noisy, and the kitchen can’t get everything upstairs at the same time so some of us are eating while others are waiting. Wish we’d stayed at Felix!

IMG-0316

Finally, here’s a recipe for benne (sesame) wafers, a Gullah favorite — and now, one of mine too.

Benne Wafers

Ingredients

  • 1 cup sesame seeds
  • 3/4 cup butter, melted
  • 1 1/2 cups packed brown sugar
  • 1 egg
  • 1 teaspoon vanilla extract (+ optional splash of lemon juice)
  • 1 cup all-purpose flour
  • 1/4 teaspoon salt
  • 1/4 teaspoon baking powder

Directions

  1. Preheat oven to 375 degrees F (190 degrees C). Lightly grease a baking sheet or cover it with parchment paper.
  2. Place the benne (sesame) seeds on an ungreased baking sheet and toast until light brown (about 10 minutes). Watch closely so they don’t burn!
  3. In a large bowl mix the brown sugar, melted butter, egg, vanilla extract, flour, salt, baking powder and toasted sesame seeds together until combined.
  4. Drop dough by spoonfuls (each about ½ teaspoon) 1½ inches apart onto the baking sheet.
  5. Bake at 375 degrees F (190 degrees C) for 4 to 6 minutes, until light brown.

Let cookies cool for about 2 minutes before removing from baking sheet to a wire rack to cool completely. Store cooled cookies in an airtight container.

Makes about 4 dozen, depending on the size of your spoonfuls.


Charleston Sojourn Pt 2

DAY 2

Fortified by coffee and a nibble of fresh croissants, we’re off to explore more of the city.

IMG-0348.jpgFirst up, a guided tour of Kahal Kadosh Beth Elohim, one of the oldest Jewish congregations in the United States.

IMG-0217
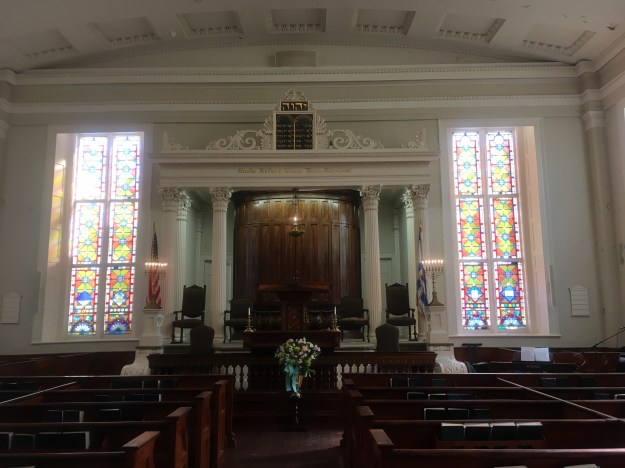
Charleston was founded in 1670, and by 1695 the first Jewish settler had arrived. Others soon followed, attracted by the civil and religious liberty of South Carolina and ample economic opportunities. Congregation Kahal Kadosh Beth Elohim (Holy Congregation House of God) was established in 1749; the original Georgian synagogue was destroyed in the 1838 fire that devastated much of the city, and the current Greek Revival building was built on the same site in 1840.

IMG-0219

Peeling plasterwork is scheduled for renovation — a big job!

The museum traces the history of these early families through maps, books, paintings and memorabilia. There’s also a wonderful letter written by George Washington to leaders of the Jewish community thanking them for their support and affirming his commitment to religious tolerance throughout the colonies.

Charleston was nicknamed “Holy City” for its religious freedoms and numerous places of worship: Calvinist, Catholic, Anglican, Quaker, Jewish, Baptist and Protestant. The many historic churches are pretty spectacular. IMG-0223

We slip inside Mount Zion AME to hear the minister’s rousing sermon.  He exhorts his congregation to “Shake, shake, shake the devil out!” during this Easter/Passover season.

Then, it’s on to The Charleston Museum.  Exhibits include artifacts, natural history, decorative arts and vivid depictions of plantation life.  Since the museum is overrun with school groups, we beat a hasty retreat to tour the nearby Joseph Manigault HouseIMG-0238.JPGThe family still lives locally and has kept the good furniture so most displays are true to the period but not original; that’s disappointing.

Back in the now-deserted Charleston museum, we admire quilts and dinosaurs.

Next: a “light” lunch of crab cakes and hush puppies at Hyman’s Seafood, established in 1890 when portions (and people) were a lot smaller.


Then: antiquing on King Street, and a folk art exhibit at the Gibbes Museum.

IMG-0193

George Birlant on King Street, founded 1922

IMG-0255

This enormous sweetgrass basket took 3 years to craft. It’s stunning.

IMG-0256IMG-0246.JPG

IMG-0249.JPG

I’d have gone to this dentist in the 1800’s, wouldn’t you?

IMG-0260

A spectacular marble bust in the permanent collection.

We meet up with T&B for dinner at FIG, which is my favorite meal so far.

IMG-0263.JPG

 French’s French-fried onion rings were a childhood fave. FIG’s are a bit more sophisticated.


Hump Day Hacks

Happy Wednesday! Two clever tips caught my eye this week.

How to remove oil stains

olive-oil-356102_640

Ever dripped olive oil on your clothes, or is it just me? I recently read that one surprising item will remove the stains if you act quickly.

The usual go-to’s are dish soap and laundry detergent, which break down oil. The surprise: aloe vera. You simply soak the stained area in water and rub the gel into the stain. Next, hand-wash the piece and allow it to air-dry.

My question: if you’re hand washing with soap anyway, who’s to say the aloe vera made the difference? But, worth a try if you already have it in the house!

How to keep white sneakers white

sports-shoes-2465911_640

Unlike when I was a kid, pristine sneakers are the desired look these days. And the best way to keep them white is to wash them in the washing machine.

Step 1: The night before, sprinkle about 3 tablespoons of baking soda on the outside and inside of your shoes. Be sure to dust it off before you wash them.

Step 2: Remove shoelaces, place in a pillowcase or wash bag and put them in the washer. Taking the laces out of your sneakers makes sure they get totally clean and no remaining dirt stays caked on under the holes.

Step 3: Use a shoe brush or old toothbrush to remove any loose dirt before you put your (lace-less) shoes in the washer.

Step 4: Next, add several towels. The towels act as a buffer between the shoes and the washer, preventing them from getting too knocked around or damaged during the wash cycle. Putting your sneakers in a separate wash bag adds extra protection.

Step 5: Set your washer on the cold delicate cycle and use liquid detergent. No chlorine bleach!

Step 6: Let your sneakers air dry after washing. Never put any type of shoes in the dryer, as the extreme heat will warp rubber or metal details.


A True Story

I always enjoy my monthly massage, not least because my therapist is smart, funny and usually has an interesting story to share.

Today we were talking about the hassles of resuming our maiden names after divorce. This reminded her of someone who lived in the small Texas town where she grew up.

This fellow, the town drunk, decided one day that he wanted to legally change his name to his high school nickname, Squirrel.

He went to court and told the judge what he wanted to do.  The judge thought he was kidding, or drunk, or both.

“Squirrel?” “Really?” “Yes.” 

“Are you sure?” “YES!” 

The back-and-forth went on for awhile and both parties were getting exasperated. Finally, the judge asked again, “You REALLY want to change your name to this?” “YES!!! Squirrel!! Period!!”

And the judge legally changed his name to Squirrel Period, as he has been known ever since.

Only in Texas.

cute-3186995_640


For the Love of Carbs #3

Last week we experimented with bread porn.  This week, class entered horror movie territory as we were introduced to… The Slasher!!

The slasher, otherwise known as a bread lame (“lahm”, “lahm-uh”, or as our instructor endearingly pronounced it, “lamb-y”), is a tool used to score dough so that it can expand during baking.  For this session, we improvised with a razor on a stick, which worked pretty well.

unnamed-1

Our final class was perhaps overly ambitious.  We made baguettes, another sourdough, pumpernickel (which we baked at home) and pizza (which we ate during our break).

Baguettes are nearly impossible to bake properly at home since it’s difficult to generate enough steam but we all wanted to try. Abby had made the dough in advance, which looked like Jabba the Hutt as it shimmied its way from its giant pan to the workspace.

IMG-0091

Our baguettes ended up a bit under-baked due to time constraints, and mine got squashed on the ride home. They were tasty, though, and worth another try in the future.

The pizza was fun to make and we’d all worked up an appetite, but I’ll probably stick with Bobby Flay’s recipe. 

Pumpernickel was the most successful, perhaps because it wasn’t rushed.

IMG-0114

The sourdough was good, too.

IMG-0112

Someone asked Abby why she decided to make baking her career, not just a hobby. Her advice: If you lose track of time while you’re doing something, it means you really love it.

We certainly did!

bread class workshop pic (2) (1)

(Abby’s the tall one in the middle, back row. Yours truly is front row left in a scarf.)


For the Love of Carbs #2

Bread class continued with good spirits and much laughter, as we embarked on focaccia, ciabatta and a new method of making sourdough.

IMG-0070

Is that apprehension I’m sensing?

First up, some brave souls brought in their starters for Abby to evaluate. We learned that a starter is ready to use if a small bit floats when immersed in water. Sadly, most of our efforts sank like a stone. (Cue “My heart will go on”.)

To make both focaccia and ciabatta, you begin with a “poolish”, which is pronounced poo-leash rather than rhyming with “foolish” which is how we felt about our sinking non-starters. This is essentially another type of starter that is ready much faster and keeps the dough nice and airy.

Abby kept us on a strict schedule so we could bake these during class. Unfortunately, my benchmate and I made the crucial mistake of flouring the tops of our ciabattas, not realizing they’d be flipped over. (Or possibly not paying attention?) And I opted not to cut the dough into rolls, ending up with a pale loaf bearing more than a passing resemblance to a manatee.

IMG-0074.JPG

Ciabatta in the oven

IMG-0072.jpg

Abby suspects they’re not quite ready.

Our focaccias weren’t much prettier, being pancake-flat. But despite their wonky appearance, both breads were pretty tasty.

IMG-0073

Focaccia resembling paddleboards

The big excitement of the evening came when we learned a new technique that brought out our inner dominatrix. Abby had e-mailed us a video to get us “in the mood”. It’s called the slap and fold method, or, as my friend S dubbed it, Food Porn: You slap your dough on the counter, stretch it up and slap it down again. After about 5 minutes the dough is ready to rest, and so are you.

Who knew that bread making had a racy side? Or that my wardrobe needs a black leather apron?!

                                  (Above, clockwise: focaccia at home – I added rosemary -, ciabatta, sourdough.)

I can only imagine what’s in store for us this week. Stay tuned, dear friends.

For the Love of Carbs

Whoever said, “Man cannot live by bread alone” clearly didn’t live in my house. To that end, I’ve embarked on a series of 3 consecutive weekly classes in bread making, hoping to hone my skills or at the very least make and eat lots of yummy things.

Our first class was Tuesday night. Ten strangers introduced ourselves, commenting on each other’s aprons (the best one: printed with unpronounceable Scottish phrases) and gleaning levels of expertise. We ran the gamut from novice to knowledgeable.

Few things bind people together more than a shared interest; in this case hunger, as the class runs from 6-9 pm and no one had had dinner. As we descended on the snack table – samples of the bread we’d soon be baking – things quickly loosened up.

And then the work began. Abby, our intrepid instructor, handed out sheets of recipes (blue emmer sandwich bread, sourdough and challah) and led us back to the industrial kitchen where we started our first loaf.

First lesson: Measure your ingredients by weight, not volume. Turns out, it’s more accurate since flours vary in density, and it’s easier too. You put a bowl on a scale, set it to zero, and reset it to zero after you’ve added each ingredient. To quote the Monkees, now I’m a believer.

The whole group got down and dirty as we over- or under-loaded our bowls, covered ourselves in flour while dumping it out to re-measure, and got sticky bits of dough in our hair and jewelry. (Note to self: don’t wear a watch.) If you’re a clean freak, this “sport” may not be for you. One tip if you don’t want to keep running to the sink: keep a bowl of extra wheat flour available and rub your hands in it to remove most of the dough.

Then we started kneading. Not only is this a great upper-body workout (3 hours of standing and punching dough should cancel out all those calories, right?), it must be one of the earliest forms of therapy. PINCH! That’s for your annoying neighbor. POUND! That’s for your obnoxious boss. FLATTEN! That’s for every bad relationship you’ve ever had.

We also learned a great trick for preserving your starter if you don’t make bread multiple times a week: Roll some of the sticky starter in wheat flour and keep rubbing until it dries out into a crumbly nub. Abby says it will keep for quite awhile in the fridge (will have to ask how long “awhile” is) until you’re ready to reactivate it.

To keep your starter bubbly and active you’ll have to feed it 1-2x a week. (Starter is a fairly demanding pet but at least it won’t pee in the house!)

Keep it loosely covered in the fridge. A day or two before you plan to bake, dump out about 90% (this takes self-discipline as it seems so wasteful), then add back equal parts water and flour (half wheat/half bread flour) – making at least 130g (1 cup for your recipe plus extra to maintain it). Cover loosely and let it sit out on your counter for 8-10 hours. When the starter gets airy and fragrant, repeat the process.

If you don’t plan to bake for a few days, feed your leftover with more flour than water or dry it out as suggested above.

Exhausted but exhilarated, we left with three batches of dough to bake on our own, plus a dried nub of starter to resurrect. Abby encouraged us to name our starters – hers is Shiva. Since I have a tendency to kill mine on a regular basis, I’m naming him Lazarus.

Verdict:

“Meh” on the blue emmer bread. It was kind of flabby and spongy. A little too much like health food and not enough like “indulgence”.

“Yay” on the sourdough method, although the amount of dough we made was a bit small for my cast iron Dutch oven. And my usual method yields a darker, crisper crust.

“Pretty good” for the challah – I prefer the recipe in the Silver Palate Cookbook. DH says this one reminds him more of a brioche.

Looking forward to this week’s class. Especially the snacks.

p.s. Final tip: Don’t add salt with the rest of your ingredients.  Let dough hydrate (aka rest) for an hour and then mix in the salt.  Apparently it interferes with gluten production. Did not know that.

[main photo source: pixabay.com]